Tired of crowded public servers in Fish It! on Roblox? Whether you’re looking to enjoy a peaceful fishing session with friends or want to ensure you always have a spot to play, creating a Free Private Server is the perfect solution. The best part? In Fish It!, this feature is completely free and doesn’t require any Robux.
This guide will walk you through the entire process of creating, configuring, and managing your very own Free Private Server in Fish It Roblox.
How to Create a Free Private Server in Fish It
Follow these simple steps to get your server up and running.
Step 1: Navigate to the Game’s Main Page
First, you need to exit the game if you are currently playing. From your Roblox home screen, search for Fish It! and go to its main game page. Do not click the green “Play” button yet.
Step 2: Locate and Create the Server
On the Fish It! game page, scroll down below the game description and screenshots until you see the “Servers” section. Here, you will find a tab or button labeled “Private Servers”. Click on it.
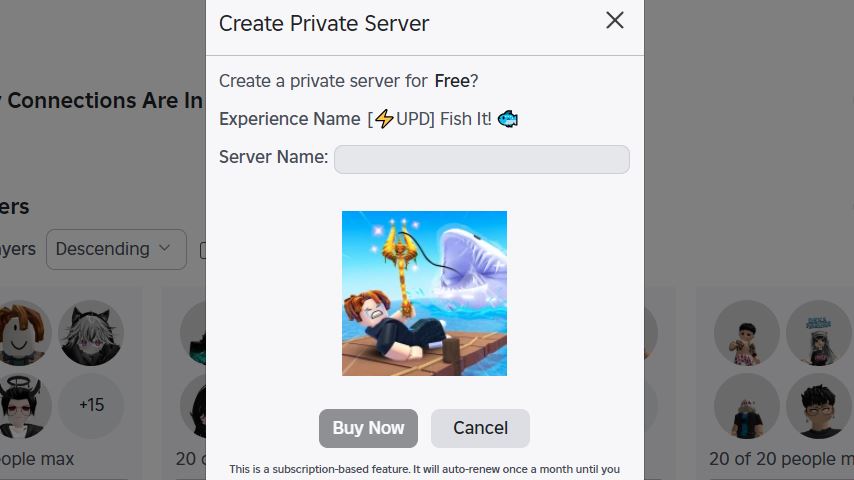
Next, click the prominent “Create Private Server” button. While some Roblox games charge a fee for this feature, Fish It! provides Private Servers for free. Confirm the creation, and your server will be ready in moments.
How to Configure Your Fish It Private Server
After creation, click the “Configure” button next to your new server’s name. This opens a menu where you can customize your server’s access and identity.
Change Server Name: You can rename your server from the default to something more personal, like “[YourName]’s Fishing Spot,” so your friends can easily identify it.
Toggle Server Access (Allow Joining): This is the master switch for your server. Ensure this setting is turned ON. If you turn it off, no one, including you, will be able to join the server.
Manage Player Access (Connection Allowed): For a more exclusive experience, you can manually add specific Roblox usernames to this list. Only the users you add will be able to join, even if they have the server link.
How to Invite Friends to Your Private Server
There are two primary ways to get your friends into your private server.
Method 1: Use the Private Server Link
This is the easiest and most common method. In the Configure menu, you will find a “Private Server Link”. This is a unique URL that you can copy and share directly with your friends. When they click this link, it will automatically launch Fish It! and place them into your private server.
Method 2: Let Them Find It in the List
Your friends can also join manually. They need to:
Go to the Fish It! game page.
Scroll down to the “Private Servers” section.
Look for your server’s name in the list and click “Join.”
If you have configured your server to be invite-only via the “Connection Allowed” list, make sure you have added their Roblox usernames first.
Important Management Tip: Regenerate the Link
If you’ve shared your server link widely and want to revoke access for everyone, you can use the “Regenerate” button in the configuration menu. This will instantly create a new, unique link and invalidate the old one. It’s a great way to reset your server’s access if the previous link was shared too publicly.
Frequently Asked Questions (FAQ)
Q: Is the Private Server in Fish It! really free?
A: Yes. Unlike many other Roblox games, creating a Private Server in Fish It! is completely free and does not require any Robux.
Q: Why can’t I or my friends join my private server?
A: First, check the “Allow Joining” setting in the server configuration and ensure it is turned ON. If you are using the “Connection Allowed” list, make sure your friends’ Roblox usernames are added to it.
Q: How many people can join my Fish It! private server?
A: The player capacity is determined by the game’s code. While the exact number can vary, private servers typically support a standard-sized lobby, similar to public servers.
Q: Can I have more than one private server?
A: Most Roblox games, including Fish It!, typically allow you to create only one private server per game per account.
Q: What happens to my private server if I leave the game?
A: The server will remain active for a short period. If no one is in the server after a while, it will shut down. However, the server configuration is saved, and you can simply re-join using your link to start it up again.
Conclusion
Creating a Free Private Server in Fish It Roblox is a straightforward process that dramatically enhances your gameplay experience. It provides a reliable, exclusive space for you and your friends to fish without the hassle of full public servers. By following this guide to set up, configure, and manage your server, you can ensure countless hours of peaceful and organized fishing fun. So, create your server today and cast your line in your own private paradise.
Related posts:
- How to Get Crystal Star Enchant in Fish It (Meteor Shower Event)
- Fish It Coral Update Patch Notes – New Sharks, Island, and Rewards
- Fish It Codes & Gift September 2025 (Coral Update)
- Fish It Armor Shark Update Guide – New Secret Fish, Boats, Skins, and Friend Luck
- Fish It Magma Shark Update – All You Need to Know
- How to Get the Megalofriend Rod Skin in Fish It