In Exiled, your choice of perks can dramatically impact your chances of survival and success in each dungeon run.
Some perks are transformative, while others are best left unused.
This Exiled perks tier list categorizes and explains each perk, helping you make informed decisions and optimize your gameplay.
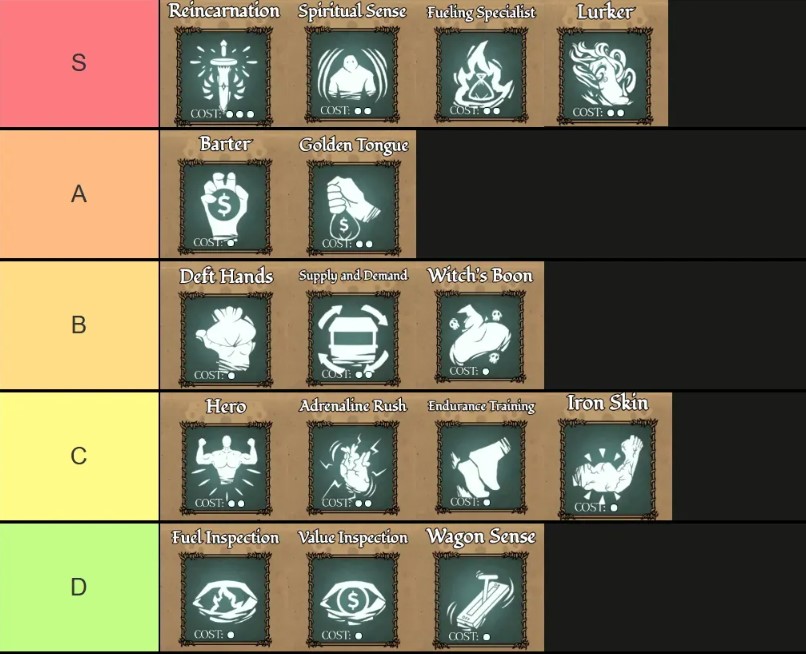
Understanding Exiled Perk Tiers
This tier list ranks perks based on their overall effectiveness, versatility, and impact on your gameplay. Keep in mind that tier lists can be subjective and might change as the game evolves.
- S-Tier (Game-Changing): The absolute best perks in the game. These offer significant advantages and can drastically improve your runs.
- A-Tier (Essential): Perks that significantly boost your in-game economy and efficiency. Highly recommended.
- B-Tier (Reliable): Perks that provide consistent benefits without being overpowered. Good choices for most situations.
- C-Tier (Situational): Perks that are only useful in very specific scenarios or team compositions. Their value is limited.
- D-Tier (Weak): Perks that are generally underpowered or quickly become obsolete as you progress.
Exiled Perks Tier List and Explanations
Here’s a breakdown of each perk, categorized by tier:
S-Tier (Game-Changing):
- Reincarnation:
- Effect: Grants a free revive upon death.
- Use: Essentially gives you a second chance, allowing for clutch plays and saving you gold.
- Why It’s S-Tier: A free revive is incredibly powerful in a game with permadeath or high stakes. It’s a safety net that can save a run.
- Lurker:
- Effect: Allows you to crouch and hide from enemies.
- Use: Ideal for evading dangerous encounters or setting up ambushes.
- Why It’s S-Tier: Stealth and the element of surprise are incredibly valuable in Exiled.
- Spiritual Sense:
- Effect: Detects monsters through walls.
- Use: Provides a significant tactical advantage, allowing you to anticipate enemy positions and avoid danger.
- Why It’s S-Tier: Knowing where enemies are before they see you is a massive advantage in a game focused on survival.
- Fueling Specialist:
- Effect: Increases fuel gained from items.
- Use: Crucial for group runs to maintain resources.
- Why It’s S-Tier: Resource management, specially on group runs is essential.
A-Tier (Essential):
- Barter:
- Effect: Grants a 20% discount on merchant items.
- Use: Save gold when purchasing essential supplies.
- Why It’s A-Tier: While a 20% discount might seem small, it adds up significantly over time, allowing you to acquire more gear and resources.
- Golden Tongue:
- Effect: Increases gold gained from selling items by 50%.
- Use: Maximize your profits from looted items.
- Why It’s A-Tier: A massive boost to your resource gathering, accelerating your progression and allowing for better gear purchases.
B-Tier (Reliable):
- Deft Hands:
- Effect: Grants two random items from the lucky bag.
- Use: Provides additional items, but the randomness makes it less reliable.
- Why It’s B-Tier: Useful early on, but the unpredictable nature of the rewards limits its long-term value.
- Supply and Demand:
- Effect: Allows you to reroll merchant items twice.
- Use: Helps you find specific items you need.
- Why It’s B-Tier: Valuable for acquiring essential gear or consumables.
- Boon:
- Effect: Enhances the effects of potions.
- Use: Increases the effectiveness of your healing and buff potions.
- Why It’s B-Tier: Can be a lifesaver in tough situations, providing a significant boost to your survivability.
C-Tier (Situational):
- Hero:
- Effect: Revives two players in multiplayer.
- Use: Excellent for team play, but less useful in solo or duo runs.
- Why It’s C-Tier: Highly dependent on team size and composition.
- Adrenaline Rush:
- Effect: Boosts speed when hit.
- Use: Can be helpful for escaping, but relies on taking damage.
- Why It’s C-Tier: Situational and potentially risky.
- Endurance Draining:
- Effect: Increases sprint distance.
- Use: Improves mobility, but not a game-changing advantage.
- Why It’s C-Tier: Useful, but other perks offer more significant benefits.
- Iron Skin:
- Effect: Reduces incoming damage.
- Use: Good for beginners, but less impactful as you improve your skills and acquire better gear.
- Why It’s C-Tier: Damage reduction is valuable, but other perks offer more significant advantages in the long run.
D-Tier (Weak):
- Value Inspection:
- Effect: Shows item values.
- Use: Useful for beginners learning item values, but becomes redundant quickly.
- Why It’s D-Tier: Once you memorize item values, this perk becomes useless.
- Fuel Inspection:
- Effect: Reveals fuel values of items.
- Use: Helpful for beginners, but becomes less important as you learn which items provide fuel.
- Why It’s D-Tier: Similar to Value Inspection, it loses its value over time.
- Wagon Sense:
- Effect: Detects wagon movement.
- Use: Often redundant, as you’ll likely be aware of wagon movements already.
- Why It’s D-Tier: Provides minimal practical benefit.
Conclusion
This tier list provides a comprehensive overview of the perks available in Exiled, categorizing them based on their overall effectiveness.
Prioritize acquiring S-Tier and A-Tier perks to significantly enhance your gameplay.
While lower-tier perks can be situationally useful, the top-tier options will provide the greatest advantages.
Remember to experiment with different perk combinations to find what best suits your playstyle and the challenges you face in Exiled.
Good luck, and may your dungeon runs be filled with success.