In Dune Awakening, managing base permissions is an essential task to ensure that only the right players can access and modify your base. As the Owner, you have control over who can interact with your base, how they can contribute, and what roles they can assume. Whether you’re running a private base or want to allow your Guild members or even the public to enter, understanding the permission system is crucial for maintaining control and security in the game.
This guide will walk you through the process of giving base permissions, managing roles, and controlling access through features like Guild Access and Public Access.
What Are Base Permissions in Dune Awakening?
In Dune Awakening, base permissions define which players can access your base and what actions they can perform. The game provides a structured system of roles, allowing the Owner to grant varying levels of access to different players. Permissions can be adjusted to either provide limited access or grant full control, depending on the role assigned.
Roles like Associate, Co-Owner, and Guild Member all come with specific permissions, allowing you to control who can do what within your base. Additionally, Guild Access and Public Access options allow you to broaden or limit access based on specific criteria.
How to Give Base Permissions in Dune Awakening
To give base permissions in Dune Awakening, you must first ensure that you are the Owner of the base. Only Owners have the ability to manage permissions and adjust roles for other players.
Here’s a step-by-step guide on how to manage base permissions:
Step 1: Become the Base Owner
Before you can assign permissions, you need to be the Owner of the base. If you’re not the Owner, you won’t have access to the Sub-Fief Console, which is where you can manage permissions.
If you’re not the Owner, you’ll need to request the Owner to assign you a role with appropriate permissions. Once you are the Owner, proceed to the next steps.
Step 2: Access the Sub-Fief Console
Once you are the Owner, you can access the Sub-Fief Console to manage permissions. The console is the central hub for controlling who can enter your base and what they can do once inside.
To open the Sub-Fief Console, go to your base and look for the console option, usually located in a central area or near the base’s entrance.
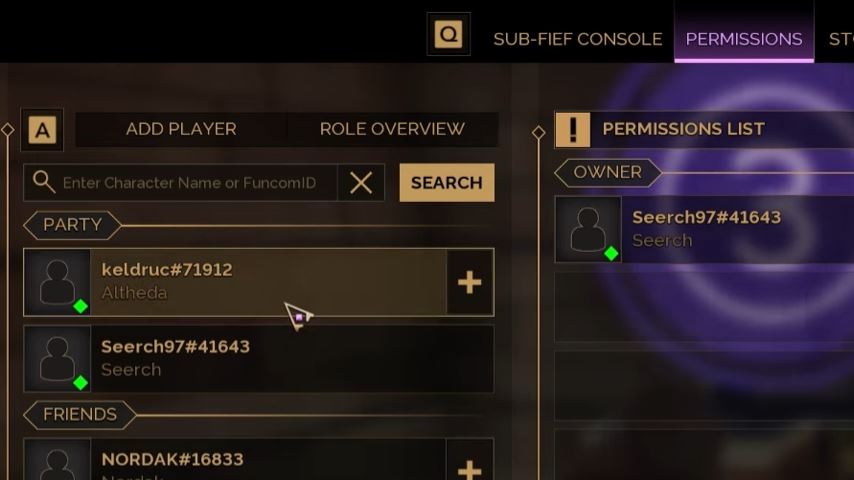
Step 3: Open the Permissions Tab
In the Sub-Fief Console, navigate to the Permissions tab. This is where you can add players to your base’s permission list and assign them various roles.
Step 4: Assign Roles to Players
Once in the Permissions tab, you can add players to your base’s access list and assign them a role. Roles determine what actions the player can perform within your base.
Associate: This is the default role. Associates have limited access and are generally allowed to interact with certain areas of the base, but they can’t make significant changes or manage the base.
Co-Owner: Co-Owners have full access to the base and can make significant changes, including adjusting permissions for others, managing resources, and more. This role grants the highest level of access after the Owner.
Guild Access: You can grant access to specific Guild members. Guild members with the appropriate rank will be able to enter your base and interact with it based on their assigned role.
Public Access: If you want to open your base to everyone, you can activate Public Access, allowing any player to enter your base. However, be cautious as this opens the door for potential griefing by external players.
Step 5: Adjust Access Permissions
For each player or Guild Member added, you can adjust their permissions and roles. As the Owner, you have full control over which areas they can access and what they can do once inside.
Guild Access: To allow Guild Members access, go to the Guild section and assign roles based on their rank within the Guild. You can either allow all Guild members or choose specific ones.
Public Access: If you want everyone to be able to enter your base, turn on Public Access. Be cautious with this setting, as it can lead to unwanted players accessing your base and potentially causing problems like griefing or looting.
Step 6: Monitor and Update Permissions
It’s important to regularly monitor the permissions and roles in your base, especially if you’ve enabled Public Access. Keep an eye on who is entering and leaving your base, and make adjustments as necessary to ensure that your base remains secure.
If you’re managing a Guild, make sure that only trusted members are granted Co-Owner status or other high-level permissions.
Understanding Base Access Options
In Dune Awakening, there are several important access options that you can manage to control who can enter your base.
1. Guild Access
Guild Access allows you to grant entry to members of your Guild. This is particularly useful for managing larger groups of players and ensuring that only those who belong to your Guild can enter your base. However, Guild Access doesn’t mean all Guild Members will have full control of your base. You must assign specific roles (like Co-Owner) to provide full access.
2. Public Access
If you want to open your base to the public, you can enable Public Access. This allows any player, regardless of whether they are in your Guild, to enter your base. While this can be useful for gathering resources or showing off your base, it’s important to be aware that it opens the possibility for griefing or unwanted visitors.
3. NPC Permissions
Some NPCs, such as merchants or crafting stations, may require specific permissions to access. If you’re running a public base or a Guild base, make sure that these NPCs are accessible to the right players.
Tips for Managing Base Permissions Effectively
Only Give High Permissions to Trusted Players: Be careful with giving Co-Owner status to multiple people. Only grant this level of access to trusted players who understand the responsibility and can help manage the base.
Use Guild Access for Organization: If you’re in a Guild, use Guild Access to give your Guild Members the ability to access your base without granting them full control.
Monitor Public Access Carefully: If you decide to enable Public Access, make sure to monitor your base regularly. If any issues arise, you may want to turn off Public Access until you resolve them.
Final Thoughts
Giving base permissions in Dune Awakening is a critical part of managing your base and ensuring that only the right players can access and interact with your resources. Whether you’re granting Guild Access, enabling Public Access, or assigning roles to trusted players, managing permissions allows you to maintain control and security within your base.
By following the steps in this guide, you can ensure that your base is well-managed, secure, and properly accessible to those you trust. Keep a close eye on permissions and update them regularly to maintain control over your base and protect it from griefers.